
TL;DR
This guide shows how to build a budget retaining wall and plan a tiered front yard with smart drainage, frost-safe bases, and low-cost materials. Learn how to plan a DIY retaining wall, source blocks cheaply, and plant for curb appeal that lasts through freeze-thaw cycles.
Introduction
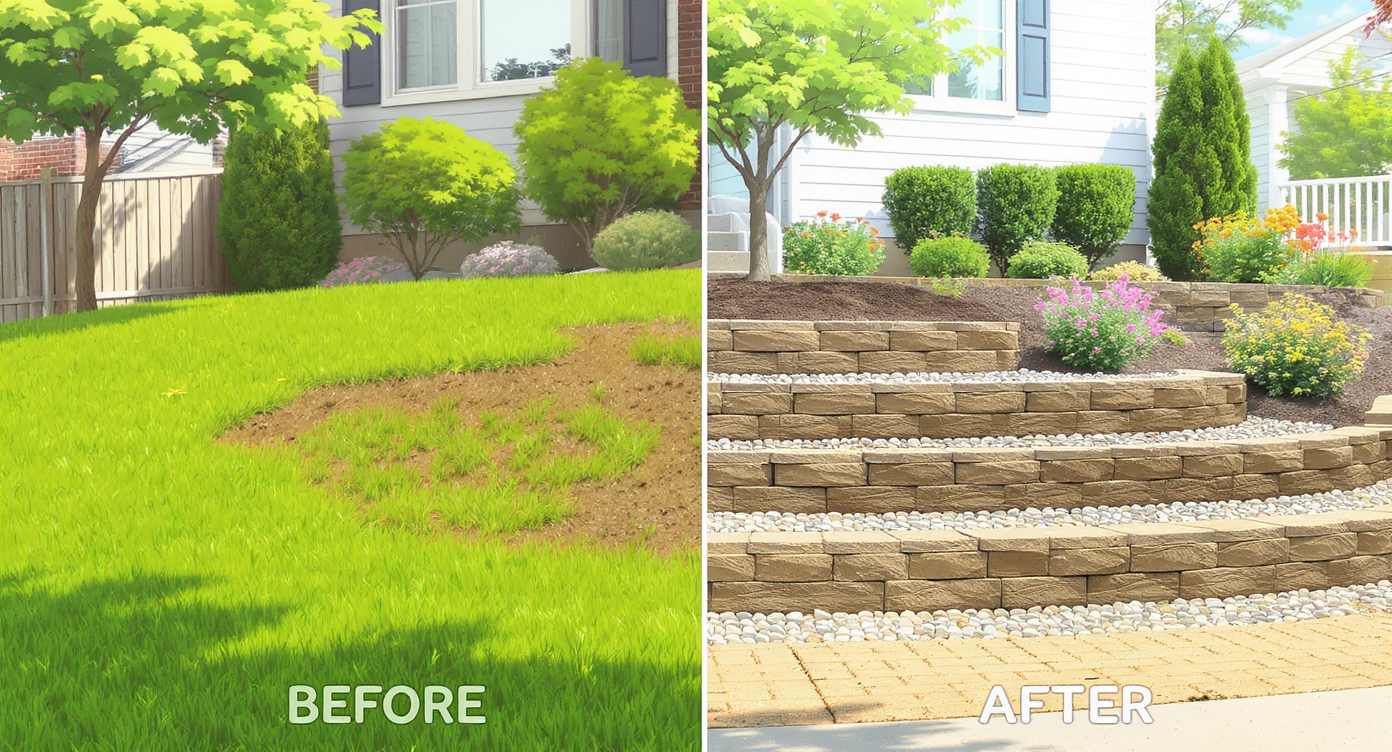
Small retaining walls trade slopes for beautiful, manageable gardens without contractor costs.
Most small retaining walls succeed or fail based on three things: a level base, clean drainage, and patient compaction. If you are staring at a sloped front yard and dreaming of gardens, a budget retaining wall can trade mowing for planting and add instant curb appeal without a contractor’s invoice.
In the past year I’ve walked a dozen DIY terraces, from Minneapolis to mountain towns, where folks stacked blocks after the kids went to bed and woke to a different yard. One homeowner spent $842 on blocks, caps, gravel, fabric, adhesive, and a tamper, proving that with planning and sweat equity, a DIY retaining wall can look pro and still be a deal.
Theme Overview
Today’s backyard design trends favor practical beauty, and a tiered front yard combines storm-smart grading, native landscaping, and low-maintenance planting. Here’s why that matters: a good wall is a water manager first, a garden frame second.
From gravity-block systems to simple French drains and native plant borders, these ideas focus on budget, performance, and long-term durability. Core keywords you will see woven throughout include retaining wall, native landscaping, curb appeal planting, and eco-friendly yard. Think of it like building a dry, stable backbone, then dressing it with plants that belong to your climate.
Anecdote
I’ve watched a Minneapolis couple build a two-tier wall after bedtime all week, then plant tulip bulbs by porch light. By Saturday morning the block lines were level, the caps tight, and the neighbors slowed their cars to stare. Sweat equity and a tape measure did the heavy lifting.
Budget Gravity-Block Retaining Wall
Most small gravity walls under 3 feet tall need a 6 to 8 inch compacted base and at least the first course buried for stability.
What it is: A stack of interlocking or lip-set blocks that rely on weight and setback to hold grade.
How it works: A flat, compacted base distributes load, while each course steps back 3/4 to 1 inch to resist pressure. Many pros now use 3/4 inch clean, angular stone for the base because it drains and compacts when tamped in 2 inch lifts; others prefer a crushed mix like class 5 for its fines. In freeze zones, a slight bury of the first course, roughly 1 inch for every 8 inches of wall height, helps lock it in. Use construction adhesive on each course in cold climates and always on caps. Field note: I’ve seen homeowners achieve laser-level tops using a long straightedge and a cheap line level, checking every two blocks.
- Lay non-woven fabric on subsoil to separate base stone from native soil.
- Compact base in thin lifts with a hand tamper or plate compactor; check level in all directions.
- Dry-fit a full course before gluing, then bond courses with polyurethane landscape adhesive.
Drainage That Keeps Walls Standing
A 4 inch perforated drainpipe daylighted at the ends and 12 inches of clean stone behind the wall can reduce hydrostatic pressure dramatically.
What it is: A simple French drain and drainage zone that moves water away fast.
How it works: Water is the force that topples walls, not just height. Place perforated pipe at the base, holes down, sloped 1 percent toward an outlet. Backfill the first 12 inches behind the wall with 3/4 inch clean stone, not soil, then wrap the interface with non-woven fabric so silt does not clog the voids. Experts recommend venting the drain at both ends or to a lower grade. Field note: In small front yards, I often see one outlet near the steps and another at the far corner for redundancy during cloudbursts.
- Use a sock-wrapped pipe or wrap your stone with fabric to prevent fines migration.
- Daylight both ends of the pipe above grade where possible.
- Keep downspouts and sump discharge aimed away from the wall.
Cold-Climate Tips for Long-Lasting Retaining Walls
In USDA Zones 3 to 6, using clean angular stone for base and backfill minimizes water retention, reducing freeze-thaw movement.
What it is: Construction choices that limit ice lenses and seasonal shifting.
How it works: Frozen water expands and lifts anything it can grab. Clean stone drains quickly, so less water freezes beneath and behind the wall. Bury the first course, keep the top a touch higher than surrounding grade to shed water outward, and glue courses in freeze-prone sites. Where sidewalks meet walls, leave a gap for seasonal movement or stay a few inches back. Field note: After heavy winters, I ask homeowners to measure setback at a few known points, so any creep forward is obvious by spring.
- Compact base and backfill in thin lifts; never place soil directly against the back of the wall.
- Glue every course in harsh freeze zones, at minimum glue the top two and all caps.
- Keep the wall 2 to 6 inches off sidewalks or curbs if snowplows operate nearby.
Visualization Scenario
Upload a photo of your sloped front yard, sketch two terrace lines, drop in 3D wall blocks, and test different step locations. Toggle sun at noon in June to see which beds get six hours for perennials, then adjust the wall curve until your walkway feels natural underfoot.
FAQ
How to Visualize It
Before you plant a single bulb, map your space virtually to see walls, steps, and planting beds in context. Platforms like ReimagineHome let you preview retaining wall layouts, tier spacing, sunlight paths, and color palettes, turning sketches into living blueprints you can trust.
FAQ
How much does a budget retaining wall cost per square foot?
DIY gravity walls with concrete blocks typically run $10 to $20 per face square foot in materials, while professional installs often range from $25 to $50, depending on site and height.
Do I need drainage behind a small retaining wall?
Yes, a 4 inch perforated pipe at the base with 12 inches of clean stone backfill and fabric separation greatly reduces hydrostatic pressure and extends wall life.
How deep should the base be in cold climates?
Most small walls need 6 to 8 inches of compacted base and the first course partially buried; clean stone bases and backfill help limit frost heave.
How far apart should tiered retaining walls be?
Designers recommend a setback at least equal to the height of the lower wall, and preferably two times that distance, to keep tiers acting independently.
Should I glue cap blocks on a retaining wall?
Yes, caps should be bonded with polyurethane landscape adhesive; in freeze-thaw regions many experts also glue every course for added stability.
What plants work for a sunny tiered front yard?
Sun-loving, drought-tolerant natives like coneflower, black-eyed Susan, little bluestem, prairie dropseed, and sedums offer low-maintenance color and strong roots.
Clean Terminations and Corners
Burying the wall ends into the slope or returning the corner into grade makes edges look finished and adds restraint.
What it is: Professional end treatments that prevent a stair-stepped, unfinished look.
How it works: Instead of tapering the last few blocks down the lawn, turn the run back into the slope or dig the end into grade until it disappears. This creates lateral resistance and shields the edge from mower strikes. Designers often suggest keeping corners square and tight for a crisp line to the street, then softening with planting. Field note: On narrow Minneapolis boulevards, tucked-in ends also avoid the shovel-snag that happens in late winter.
- Plan terminations on paper before you start stacking.
- Use split-face corner blocks for a finished look on exposed ends.
- Sink the last course into grade and feather lawn soil to meet it.
05. Tiered Front Yard Layout
Set the upper wall back at least the height of the lower wall, and ideally two times that distance, to avoid surcharge interaction.
What it is: A stepped system that turns one steep slope into plantable shelves.
How it works: Independent tiers need horizontal separation so the upper wall does not load the lower wall like a truck parked on a ledge. Measure setback from the back of the lower wall, not the face. If space is tight, consult an engineer or use geogrid reinforcement per manufacturer tables, especially when walls approach 3 to 4 feet or carry driveways. Field note: In small urban front yards, a shallow top terrace, even 24 inches deep, is enough for a pollinator strip without overloading the lower wall.
- Stake the terrace lines with mason’s line and mark risers and runs.
- Keep at least a 2 percent slope across terraces to move water off the wall.
- Add steps where your feet naturally cut across, not where it looks symmetrical on paper.
06. Planting the Terraces for Curb Appeal
Most sun-loving perennials need 6 hours of direct light and 12 to 18 inch spacing to fill without crowding.
What it is: A native-leaning planting plan that holds soil, feeds pollinators, and stays tidy.
How it works: Roots knit terraces together. Choose deep-rooted natives like little bluestem, prairie dropseed, coneflower, and asters for a Zone 4 to 6 front yard; add spring bulbs like tulips and daffodils in fall for early color. Keep a 4 to 6 inch gravel strip along the wall face to avoid soil splash and staining. Mulch 2 to 3 inches, not against stems. Field note: I’ve seen gardeners tuck a little free library by the steps and flank it with lavender and catmint, turning the terrace into a neighbor magnet.
- Group plants in threes for color impact and stagger bloom times from May to October.
- Use groundcovers like creeping thyme or sedum near caps for a soft edge.
- Leave a small bare patch for ground-nesting bees if you’re building a pollinator patch.
07. Sourcing Cheap Materials
Buying discontinued pallets, marketplace leftovers, and off-spec quarry stone can cut block costs by 30 to 60 percent.
What it is: A scavenger’s strategy for budget landscaping.
How it works: Big-box stores periodically discount blocks and caps; stone yards sell shorts and broken bundles; contractors often unload overages if you can pick up same day. Flexibility is the currency here. Bring a trailer, load quickly, and always count pieces twice. Field note: I’ve watched homeowners shave hundreds off cap costs by mixing two compatible colors in a simple pattern.
- Set alerts on marketplace apps and be ready to haul same day.
- Ask for discontinued or color-variation pallets at the store desk.
- Visit Habitat ReStore for surplus landscape fabric, edging, or tools.
08. Measure, Monitor, Maintain
Checking setback overhang at three to five spots each spring is an easy way to spot movement before it becomes failure.
What it is: A quick annual inspection routine.
How it works: Use a ruler to measure the step-back distance from face to face at a few marked locations, then record the numbers. If the wall creeps forward seasonally, investigate drainage and correct outlets. A gentle scrub and rinse every year or two keeps faces clean. Field note: A homeowner who Sharpied tiny tick marks on the caps could tell at a glance, one year later, that everything stayed put.
- Keep outlets clear of mulch and plant debris.
- Top off joints with adhesive if any caps loosen.
- Touch up mulch and re-edge beds each spring for a crisp line.