
TL;DR
Yes, you should remodel a “nice” kitchen if the layout fails your life, but prioritize circulation, safety, and lighting before chasing trends. Polished porcelain floors read bright in photos but can be slippery and unforgiving; match color temperatures, check tile slip ratings, and test work zones digitally. Try your own design ideas instantly on ReimagineHome.ai (https://www.reimaginehome.ai/).
Remodeling a “Nice” Kitchen: What Actually Matters

Effective kitchen layouts prioritize flow, lighting harmony, and floor safety to enhance daily living.
A layout change impacts daily function more than any single finish, often improving flow by 30–50% just by removing obstructions like a dated peninsula. But glossy, high-contrast surfaces and mismatched lighting can undo the win if they create glare, slips, or a clinical vibe. At a glance: - Flow first: aim for 42–48 inches between counters and an island; keep clear paths to the fridge and sink. - Floor safety: for wet areas, choose tile with a wet DCOF ≥ 0.42; polished porcelain can be slippery. - Lighting harmony: keep color temps consistent (typically 2700–3000K in kitchens for warmth) and use 90+ CRI. - Venting + mess: cooktops on islands need powerful, quiet hoods and splatter control. - Storage vs. display: balance closed storage with a small dose of open shelves you’ll actually maintain. - Sustainably-minded: donate reusable cabinets and fixtures before demo. Try your own design ideas instantly on ReimagineHome.ai (https://www.reimaginehome.ai/). For deeper dives, see guides on AI room redesign tools (https://www.reimaginehome.ai/blogs/ai-room-redesign-tools), planning a kitchen layout (https://www.reimaginehome.ai/blogs/kitchen-layout-planning-checklist), and choosing slip-resistant flooring (https://www.reimaginehome.ai/blogs/choose-slip-resistant-kitchen-flooring).
Why AI Tools Are Changing Home Design
AI tools streamline home design by cutting planning time and enabling rapid layout and finish experimentation.
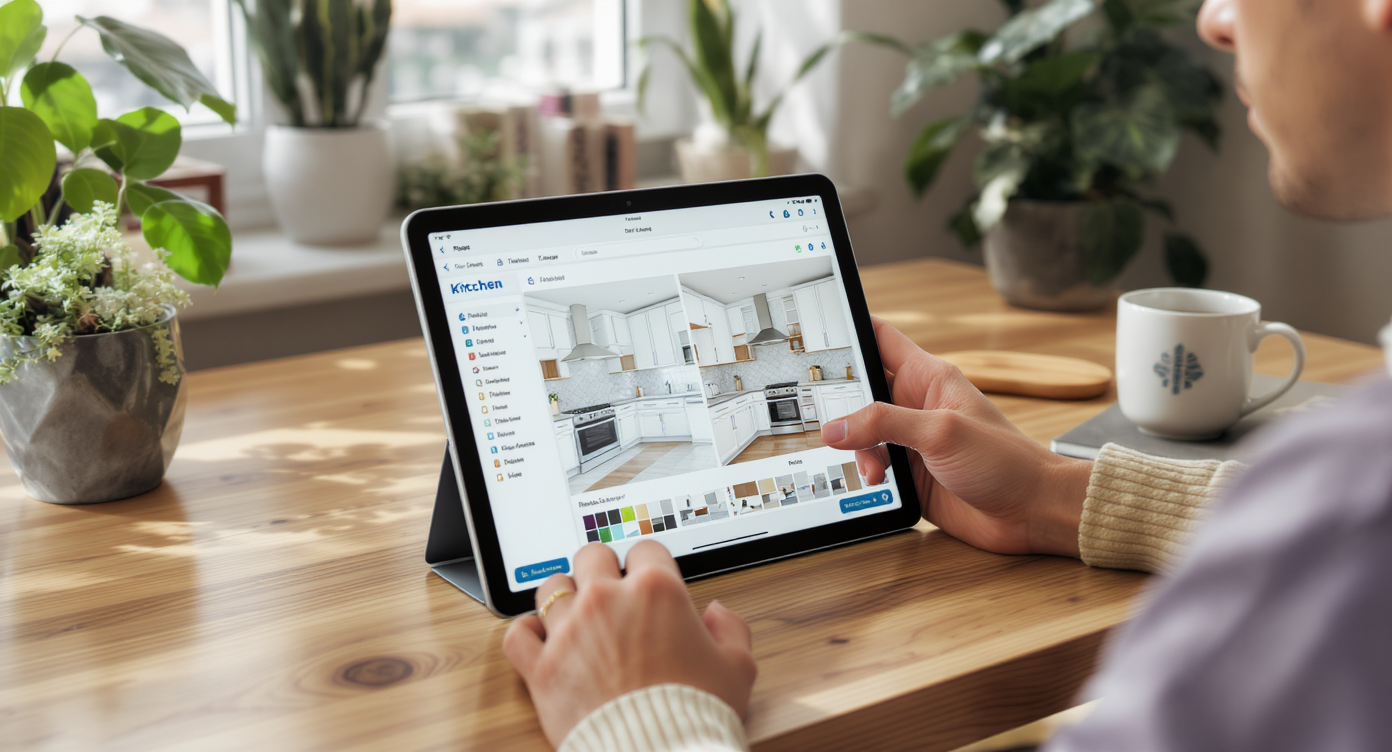
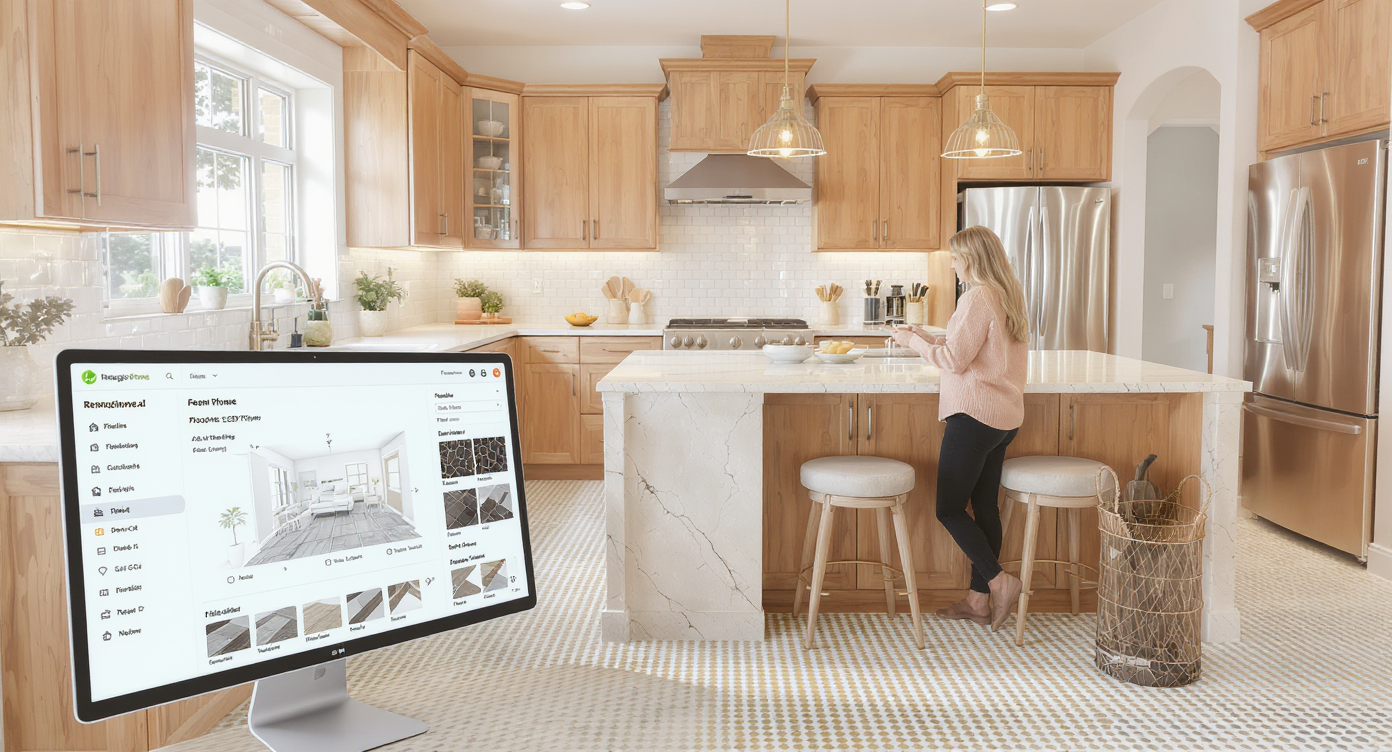
AI layout tools can cut planning time by 60–80% versus sketching by hand and swapping finishes on site. Here’s the impact you feel: visualization and personalization. When you can see three island sizes, four walkway widths, and two appliance placements side by side, you stop debating and start deciding. On ReimagineHome.ai, you can generate multiple layouts and finish palettes in minutes, then iterate: navy island with oak stools, matte tile instead of polished, brass versus brushed nickel — all without moving a single box. Why it matters right now: - Families need flow: removing a peninsula or widening an aisle to 42–48 inches lets traffic move without collisions. - Safety beats shine: preview matte vs. high-gloss floors and how under-cabinet LEDs reflect onto them. - Real-time tradeoffs: simulate a cooktop in the island and check where splatter lands, how a hood looks in sightlines, and whether you prefer a perimeter cooktop after all. When you can visualize 10+ finish combos in under 60 seconds, you choose confidence over hindsight.
Anecdote
A homeowner fell for the gleam of polished porcelain, only to realize every splash near the sink became a slip risk. After previewing a honed tile in ReimagineHome.ai, they swapped it out in the highest-traffic zone and immediately felt calmer — and safer.
Best Alternatives to Popular Design Apps (and Why ReimagineHome.ai Wins)
ReimagineHome.ai excels with intuitive interfaces and true-to-life finish visualizations for confident design choices.
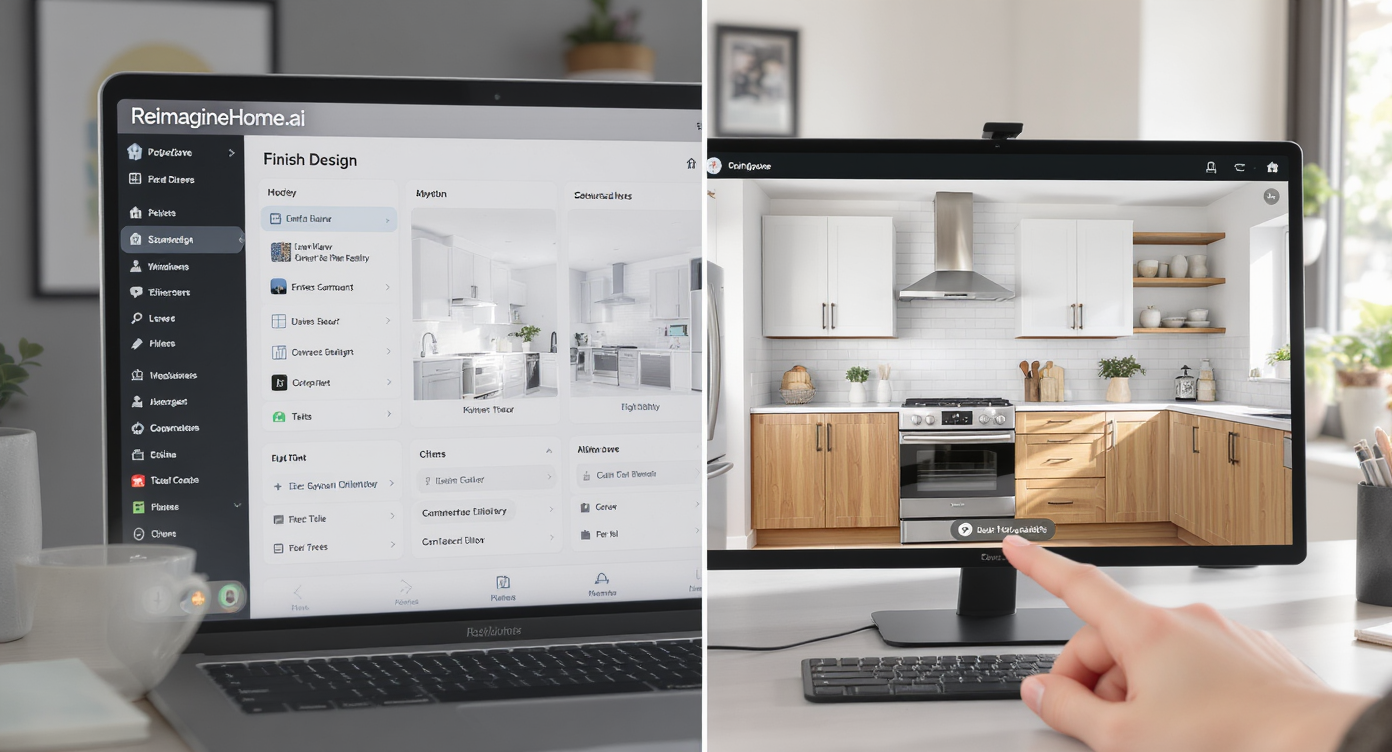
Most homeowners evaluate 3–5 floor plans and 6–10 finish combinations before landing on a final scheme. There are three big buckets of design tools: mood boards, layout planners, and 3D walkthroughs. Traditional apps are great at one of those, rarely all. ReimagineHome.ai bridges inspiration to execution. - Mood boards: Good for vibe checks, weak on real-room realism. ReimagineHome.ai lets you upload an actual photo and restyle it — think “navy island + warm wood floors + matte tile” rendered into your space. - Layout planners: Many show boxes-on-a-grid. With ReimagineHome.ai, you can test an island vs. a peninsula, verify 42–48-inch aisles, and place major appliances to stress-test the work triangle. - 3D realism: Some platforms look gamified. ReimagineHome.ai pushes toward photoreal, so you catch things like glare on polished flooring or the way mixed color temperatures fight each other. Why ReimagineHome.ai often wins in real kitchens: - Finish swaps, fast: Toggle glossy to honed in one click, and preview grout tone shifts from bright white to mid-gray. - Lighting sanity: Check 2700K vs. 3000K vs. 4000K scenarios so you don’t end up with warm under-cabinet strips fighting cool recessed cans. - From idea to plan: Save your best renders, then hand them to your contractor as a clear brief. Explore more on photoreal redesigns (https://www.reimaginehome.ai/blogs/ai-room-redesign-tools) and see a planning checklist (https://www.reimaginehome.ai/blogs/kitchen-layout-planning-checklist).
How to Use ReimagineHome.ai to Visualize Any Room
Use ReimagineHome.ai to perfect kitchen clearances and experiment with finishes for safe, stylish spaces.
Maintain 42 inches of clearance between counters and an island for two-cook kitchens; 36 inches can work for tighter, single-cook spaces. Step-by-step: Turn a photo into a styled kitchen in ReimagineHome.ai 1) Upload your space: Snap your current kitchen from two angles. Natural light helps the AI read edges and finishes. 2) Choose your goal: “Open up the flow,” “Warm up the palette,” or “Test slip-resistant floors.” 3) Test the layout: Generate an island version, a wider-aisle variant, and a perimeter-cooktop option. Note fridge access and sink landing zones. 4) Swap flooring finishes: Compare polished porcelain vs. matte porcelain, textured stone-look tile, or engineered wood. Check reflectivity and visual noise. 5) Dial in lighting: Set everything to 2700–3000K and 90+ CRI for a cohesive, flattering look; preview under-cabinet placement at the front rail to light the counters, not the backsplash. 6) Style, not sterilize: Add one warm wood element (stools, shelves, or floor), soften with runners, and ground the island with pendants. 7) Save and share: Export your top 2–3 schemes for quotes — you’ll know what to buy before demolition. More on AI kitchen visualization (https://www.reimaginehome.ai/blogs/ai-room-redesign-tools).
Real-World Stories — AI Design in Action
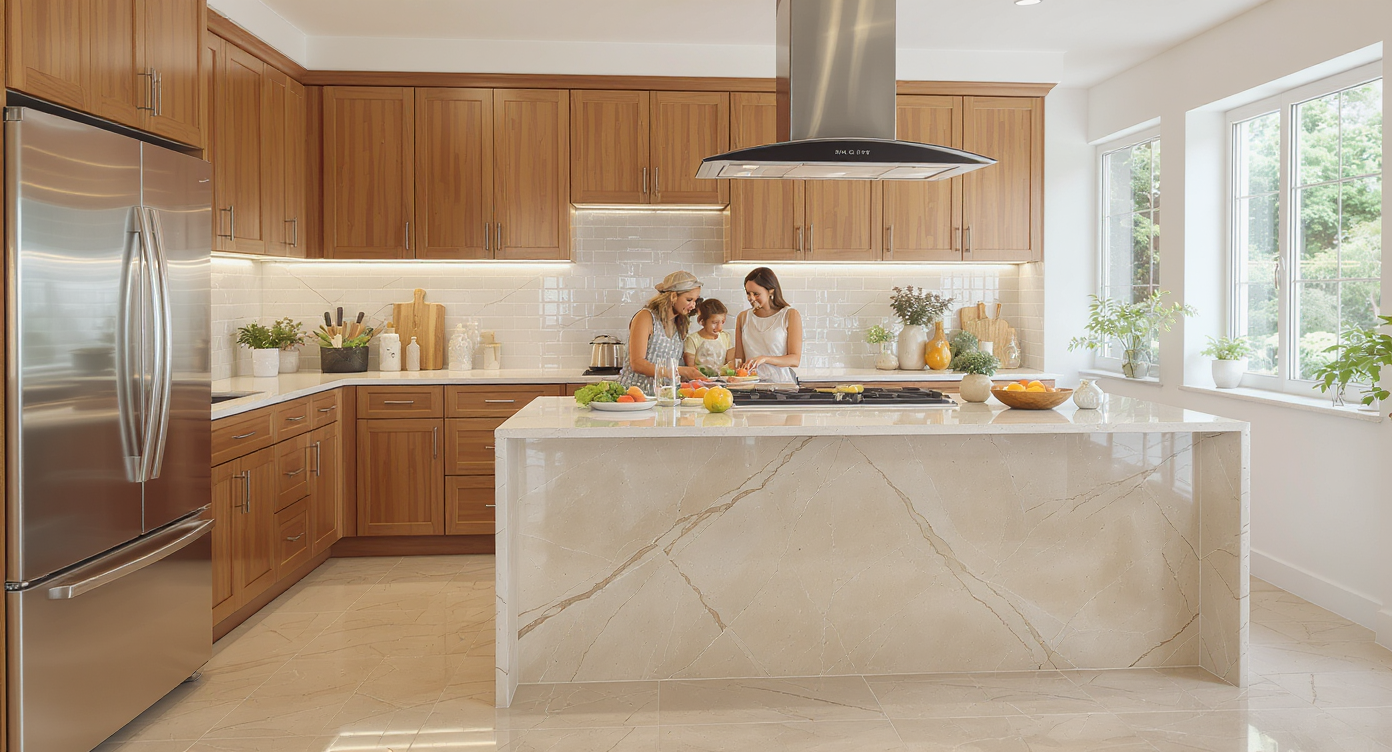
Real kitchens show AI-guided design delivers improved flow, safety, and ambiance for everyday living.
Tile with a wet DCOF of ≥ 0.42 is considered suitable for interior wet areas; polished porcelain often tests lower, especially when soapy. - The glossy-floor surprise: A young family swapped dark stone for bright polished porcelain and loved the light — until spills. Micro-runners by the sink and range helped, but a matte finish would’ve solved the root issue. They’re now planning a honed replacement in high-traffic zones. - The island rethink: Another homeowner was set on a cooktop-in-island for “chef vibes.” After rendering the ceiling hood in ReimagineHome.ai, they realized the sightline and noise tradeoffs weren’t worth it and moved the cooktop to the perimeter — the island became uninterrupted prep and seating. - Save and reuse: One couple donated their solid-wood cabinets to a local reuse center before demo. The pieces found a second life in a garage workshop — and the donors saved on haul-away fees. Alt: “AI-generated modern navy-and-white kitchen with matte tile preview by ReimagineHome.ai.” Caption: “ReimagineHome.ai lets you audition matte versus polished floors — before you buy.”
Visualization Scenario
Upload your current kitchen, then render two versions: a matte porcelain floor with 2700K lighting and a polished floor with mixed 2700K/4000K sources. Most people instantly choose the matte + warm scheme once they see the glare difference.
FAQ
What’s the first priority when remodeling a “nice” kitchen? Function and flow. Start by removing bottlenecks, aiming for 42–48-inch aisles, then lock in the work triangle before choosing finishes. Are polished porcelain floors too slippery for kitchens? They can be. Look for tiles with a wet DCOF ≥ 0.42 or choose matte/texture finishes. If you already installed glossy, add non-slip runners in spill zones. Is a cooktop on the island a good idea? It’s a tradeoff. You’ll want a quiet, high-capture hood and a plan for splatter. Many homeowners prefer a clean prep island and a perimeter cooktop. What color temperature is best for kitchen lighting? For most homes, 2700–3000K with 90+ CRI feels warm and consistent. Avoid mixing warm under-cabinet strips with cool recessed cans. How can I remodel more sustainably? Donate usable cabinets and fixtures to local reuse centers before demo, and choose durable, repairable finishes. Visualize options first to reduce costly do-overs.
Visualize Your Home’s Next Chapter
Maintain 30–36 inches of walking space around seating so stools can pull out comfortably without blocking traffic. Common mistakes (and fixes) - Over-glossed floors: If you already installed them, add non-slip runners at the sink, range, and fridge; long-term, swap to matte porcelain or textured stone-look tile with DCOF ≥ 0.42. - Mixed light temperatures: Keep all sources within 2700–3000K, and choose 90+ CRI; replace blue-white cans that fight warm strips. - Cooktop on the island without a plan: If you insist, specify a quiet, high-capture hood and a cleanup-friendly backsplash behind seating. - All-white everything: Introduce contrast — wood floors or stools, darker grout, or a mid-tone backsplash — to avoid a clinical read. - Open shelves everywhere: Limit to one focused area and load with daily-use items so they cycle through the wash. - Skipping reuse: Sell or donate cabinets, pulls, and fixtures before the dumpster arrives. Pro tips & style insights - Measurement rule: Leave at least 15 inches of landing space on both sides of a cooktop and 18 inches on the pull side of a fridge. - Under-cabinet lights belong at the front rail to illuminate counters, not splashbacks. - Grout matters: a mid-gray hides crumbs and hair better than bright white on marble-look tile. - Add warmth on purpose: one wood plane (floor, shelves, or island top) can rebalance a cool palette instantly. - Acoustics count: rugs, fabric stools, and soft window treatments help tame echo in hard-surface rooms. Ready to see it your way? Test layouts, finishes, and lighting on ReimagineHome.ai (https://www.reimaginehome.ai/).